Monday, December 29, 2008

Tools I Love: My Professional Ironing Board

View a large photo of it! ... I'm to embarrassed to post a picture of mine buried in fabric.... =)
I thought I'd write about some of the sewing tools that I really love.  To first understand why I love it so much, you should know about the old tippy ironing board I had from target for many years.  The grooves where the legs slide through to put the legs up or down had a channel on the opposite side. To be more clear, as steam condensed under the ironing pad, it would drip into this channel and cause a pile of rust.  Since I always stick pins into the ironing board when doing things like ironing bias tape or pocket flaps, I just knew they were getting stuck through the pad to rust city. I don't know about you, but I'm not a fan of tetanus, and I hear seamstresses do get it. Some of us stab ourselves a lot during sewing projects....and it's not just a surface scratch!
Finally, I'd had enough. I decided to look for the biggest and best ironing board I could find...on amazon.com so I could get free shipping.  I settled on the Rowenta professional ironing board. This means my ironing board is wider (a lovely 18.5" wide!) than the average one you buy at Target or similar store. SO AWESOME. So much more ironing and project surface. I can never go back EVER!!!  It's 53" long not counting the iron rest on the end.
What else I love about it:
  • It has a cord holder that keeps my iron cord out of my way while I iron.
  • It has the metal hot iron holder with ?silicone? heat resistant thingies on it.
  • The iron holder has a little bar you can put hangers on....or hang your bias strips or press cloth...or whatever you want!
  • It has a treated metal surface that is supposed to resist rust.
  • The top of the leg tracks are flat so no more water and rust collector!  I checked under the pad first thing to see if this was designed better than my old board.
  • It's has a "laundry rack" underneath that I pile full of fabric.... =/
  • It has heavy duty legs so it's not tippy!!!  Amazon.com says it weighs 24.2 pounds if that gives you an idea.
  • It has a nice thick ironing cover/pad. It does shrink a little in the dryer though, so beware!

Sunday, December 28, 2008

Place Mats For Alice

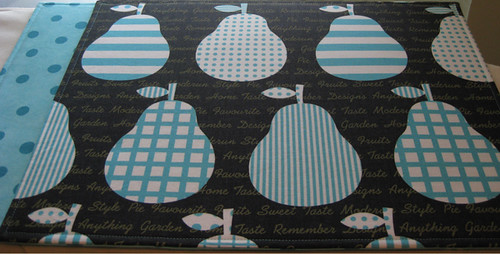
Alice's Place Mats
I made these place mats for my Grandmother, Alice. I only have 3 done so far, but it seemed like a good time for a photo =)
I wrote in more detail about how they are made in my post about Peggy's Place Mats.  The only thing different about these is that they are not home dec weight cotton. To give them a little more body, I interfaced the back side of the top. So, in this photo, the pear fabric is interfaced with fusible lightweight interfacing.  I absolutely love these pears and they will go wonderfully in my Grandma's kitchen. Polka-dots are her favorite, so I used those for the back.   The pear fabric is by kokka and the dots are a from Moda's "It's Snowing" line.  I had originally purchased the dots for some holiday season bags, but it just went so well with the pears, that I had to order more.
Other things I did differently from Peggy's Place Mats:
  • I pinked  the top fabric's (the pears) seam allowance to reduce seam bulk which shows through more on lighter weight cotton.
  • I taped two pieces of template plastic together so that I'd have a big enough piece to cut a 19" x 15" rectangle (finished place mats are 18" x 14" with a 1/2" seam allowance). Not only was it easier to cut out the place mats with the template, but it allowed me to choose the most appealing section of the fabric to cut.  I wanted to make sure that I got two full rows of pears on each place mat so I aligned my see-through template on the fabric until I was happy, then I cut!
Update: My husband is my official place mat stuffer and he just reminded me that he finds place mats with interfaced cotton much harder to stuff than "un-interfaced" home dec weight ones.  The interfacing causes a lot more friction as you try and shove the peltex into the place mat. Something to keep in mind!

Monday, December 15, 2008

Turtle Coasters

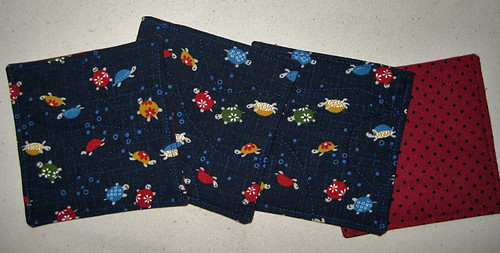
Turtle Coasters
Not my best photo, but the winter isn't giving me much light to work with!
I just finished some little turtle coasters. My first coasters ever. It was hard to part with even the tiny squares of my turtle fabric. I just love that print. I don't know who makes it, but you can find it at several places that carry Japanese import fabrics.  I chose a plain patterned back side so that I could quilt meandering lines between the turtles on the front. If there were turtles on both sides, one side would have had quilting through the turtle's bodies and I didn't want that.
How I made them...
  1. I cut 4.5" squares out of my front and back fabrics.  (I made two sets of coasters, four coasters in each finished set. So I cut out 8 fronts and 8 backs.)
  2. I cut eight 4" squares of cotton batting that I had preshrunk. I also clipped the corners off of them so they would fit nice inside the coasters.
  3. I stitched around the coasters with a 1/4" seam allowance, leaving about a 3" opening in the middle of one of the sides. I then turned them right side out through the opening.
  4. I employed my husband to stuff the piece of batting into the coaster. =) =)  Then we pressed them flat with the iron. (If you read the post on Peggy's Place Mats, you will know that Ben is an expert place mat stuffer as well...)
  5. I folded the edges of the opening to the inside and stitched around the coasters (probably about 1/8" from the edge), closing up the open side in the process.
  6. Then, I sewed meandering lines between the turtles to quilt the coasters and hold the batting in place. I was careful not to stitch over border I already sewed in step #3 to keep them looking nice.
  7. That's it, they're ready to give to a good home!
*I bought my turtle fabric at crafty planet.